Express Tutorial Part 7: Deploying to production
Now you've created (and tested) an awesome LocalLibrary website, you're going to want to install it on a public web server so that it can be accessed by library staff and members over the Internet. This article provides an overview of how you might go about finding a host to deploy your website, and what you need to do in order to get your site ready for production.
| Prerequisites: | Complete all previous tutorial topics, including Express Tutorial Part 6: Working with forms. |
|---|---|
| Objective: | To learn where and how you can deploy an Express app to production. |
Overview
Once your site is finished (or finished "enough" to start public testing) you're going to need to host it somewhere more public and accessible than your personal development computer.
Up to now, you've been working in a development environment, using Express/Node as a web server to share your site to the local browser/network, and running your website with (insecure) development settings that expose debugging and other private information. Before you can host a website externally you're first going to have to:
- Choose an environment for hosting the Express app.
- Make a few changes to your project settings.
- Set up a production-level infrastructure for serving your website.
This tutorial provides some guidance on your options for choosing a hosting site, a brief overview of what you need to do in order to get your Express app ready for production, and a working example of how to install the LocalLibrary website onto the Railway cloud hosting service.
What is a production environment?
The production environment is the environment provided by the server computer where you will run your website for external consumption. The environment includes:
- Computer hardware on which the website runs.
- Operating system (e.g. Linux or Windows).
- Programming language runtime and framework libraries on top of which your website is written.
- Web server infrastructure, possibly including a web server, reverse proxy, load balancer, etc.
- Databases on which your website is dependent.
The server computer could be located on your premises and connected to the Internet by a fast link, but it is far more common to use a computer that is hosted "in the cloud". What this actually means is that your code is run on some remote computer (or possibly a "virtual" computer) in your hosting company's data center(s). The remote server will usually offer some guaranteed level of computing resources (e.g. CPU, RAM, storage memory, etc.) and Internet connectivity for a certain price.
This sort of remotely accessible computing/networking hardware is referred to as Infrastructure as a Service (IaaS). Many IaaS vendors provide options to preinstall a particular operating system, onto which you must install the other components of your production environment. Other vendors allow you to select more fully-featured environments, perhaps including a complete Node setup.
Note: Pre-built environments can make setting up your website very easy because they reduce the configuration, but the available options may limit you to an unfamiliar server (or other components) and may be based on an older version of the OS. Often it is better to install components yourself so that you get the ones that you want, and when you need to upgrade parts of the system, you have some idea of where to start!
Other hosting providers support Express as part of a Platform as a Service (PaaS) offering. When using this sort of hosting you don't need to worry about most of your production environment (servers, load balancers, etc.) as the host platform takes care of those for you. That makes deployment quite easy because you just need to concentrate on your web application and not any other server infrastructure.
Some developers will choose the increased flexibility provided by IaaS over PaaS, while others will appreciate the reduced maintenance overhead and easier scaling of PaaS. When you're getting started, setting up your website on a PaaS system is much easier, so that is what we'll do in this tutorial.
Note: If you choose a Node/Express-friendly hosting provider they should provide instructions on how to set up an Express website using different configurations of web server, application server, reverse proxy, etc. For example, there are many step-by-step guides for various configurations in the Digital Ocean Node community docs.
Choosing a hosting provider
There are numerous hosting providers that are known to either actively support or work well with Node (and Express). These vendors provide different types of environments (IaaS, PaaS), and different levels of computing and network resources at different prices.
Note: There are a lot of hosting solutions, and their services and pricing can change over time. While we introduce a few options below, it is worth checking both these and other options before selecting a hosting provider.
Some of the things to consider when choosing a host:
- How busy your site is likely to be and the cost of data and computing resources required to meet that demand.
- Level of support for scaling horizontally (adding more machines) and vertically (upgrading to more powerful machines) and the costs of doing so.
- The locations that the supplier has data centers, and hence where access is likely to be fastest.
- The host's historical uptime and downtime performance.
- Tools provided for managing the site — are they easy to use and are they secure (e.g. SFTP vs. FTP).
- Inbuilt frameworks for monitoring your server.
- Known limitations. Some hosts will deliberately block certain services (e.g. email). Others offer only a certain number of hours of "live time" in some price tiers, or only offer a small amount of storage.
- Additional benefits. Some providers will offer free domain names and support for SSL certificates that you would otherwise have to pay for.
- Whether the "free" tier you're relying on expires over time, and whether the cost of migrating to a more expensive tier means you would have been better off using some other service in the first place!
The good news when you're starting out is that there are quite a few sites that provide "free" computing environments that are intended for evaluation and testing. These are usually fairly resource constrained/limited environments, and you do need to be aware that they may expire after some introductory period or have other constraints. They are however great for testing low-traffic sites in a hosted environment, and can provide an easy migration to paying for more resources when your site gets busier. Popular choices in this category include Railway, Python Anywhere, Amazon Web Services, Microsoft Azure, etc
Most providers also offer a "basic" tier that is intended for small production sites, and which provide more useful levels of computing power and fewer limitations. Heroku, Digital Ocean and Python Anywhere are examples of popular hosting providers that have a relatively inexpensive basic computing tier (in the $5 to $10 USD per month range).
Note: Remember that price is not the only selection criterion. If your website is successful, it may turn out that scalability is the most important consideration.
Getting your website ready to publish
The main things to think about when publishing your website are web security and performance. At the bare minimum, you will want to remove the stack traces that are included on error pages during development, tidy up your logging, and set the appropriate headers to avoid many common security threats.
In the following subsections, we outline the most important changes that you should make to your app.
Note: There are other useful tips in the Express docs — see Production best practices: performance and reliability and Production Best Practices: Security.
Set NODE_ENV to 'production'
We can remove stack traces in error pages by setting the NODE_ENV environment variable to production (it is set to 'development' by default). In addition to generating less-verbose error messages, setting the variable to production caches view templates and CSS files generated from CSS extensions. Tests indicate that setting NODE_ENV to production can improve app performance by a factor of three!
This change can be made either by using export, an environment file, or the OS initialization system.
Note: This is actually a change you make in your environment setup rather than your app, but important enough to note here! We'll show how this is set for our hosting example below.
Log appropriately
Logging calls can have an impact on a high-traffic website. In a production environment, you may need to log website activity (e.g. tracking traffic or logging API calls) but you should attempt to minimize the amount of logging added for debugging purposes.
One way to minimize "debug" logging in production is to use a module like debug that allows you to control what logging is performed by setting an environment variable. For example, the code fragment below shows how you might set up "author" logging. The debug variable is declared with the name 'author', and the prefix "author" will be automatically displayed for all logs from this object.
const debug = require("debug")("author");

// Display Author update form on GET.
exports.author_update_get = asyncHandler(async (req, res, next) => {
  const author = await Author.findById(req.params.id).exec();
  if (author === null) {
    // No results.
    debug(`id not found on update: ${req.params.id}`);
    const err = new Error("Author not found");
    err.status = 404;
    return next(err);
  }

  res.render("author_form", { title: "Update Author", author: author });
});
You can then enable a particular set of logs by specifying them as a comma-separated list in the DEBUG environment variable.
You can set the variables for displaying author and book logs as shown (wildcards are also supported).
#Windows
set DEBUG=author,book

#Linux
export DEBUG="author,book"
Note: Calls to debug can replace logging you might previously have done using console.log() or console.error(). Replace any console.log() calls in your code with logging via the debug module. Turn the logging on and off in your development environment by setting the DEBUG variable and observe the impact this has on logging.
If you need to log website activity you can use a logging library like Winston or Bunyan. For more information on this topic see: Production best practices: performance and reliability.
Use gzip/deflate compression for responses
Web servers can often compress the HTTP response sent back to a client, significantly reducing the time required for the client to get and load the page. The compression method used will depend on the decompression methods the client says it supports in the request (the response will be sent uncompressed if no compression methods are supported).
Add this to your site using compression middleware. Install this at the root of your project by running the following command:
npm install compression
Open ./app.js and require the compression library as shown. Add the compression library to the middleware chain with the use() method (this should appear before any routes you want compressed — in this case, all of them!)
const catalogRouter = require("./routes/catalog"); // Import routes for "catalog" area of site
const compression = require("compression");

// Create the Express application object
const app = express();

// …

app.use(compression()); // Compress all routes

app.use(express.static(path.join(__dirname, "public")));

app.use("/", indexRouter);
app.use("/users", usersRouter);
app.use("/catalog", catalogRouter); // Add catalog routes to middleware chain.

// …
Note: For a high-traffic website in production you wouldn't use this middleware. Instead, you would use a reverse proxy like Nginx.
Use Helmet to protect against well known vulnerabilities
Helmet is a middleware package. It can set appropriate HTTP headers that help protect your app from well-known web vulnerabilities (see the docs for more information on what headers it sets and vulnerabilities it protects against).
Install this at the root of your project by running the following command:
npm install helmet
Open ./app.js and require the helmet library as shown.
Then add the module to the middleware chain with the use() method.
const compression = require("compression");
const helmet = require("helmet");

// Create the Express application object
const app = express();

// Add helmet to the middleware chain.
// Set CSP headers to allow our Bootstrap and Jquery to be served
app.use(
  helmet.contentSecurityPolicy({
    directives: {
      "script-src": ["'self'", "code.jquery.com", "cdn.jsdelivr.net"],
    },
  })
);

// …
We normally might have just inserted app.use(helmet()); to add the subset of the security-related headers that make sense for most sites.
However in the LocalLibrary base template we include some bootstrap and jQuery scripts.
These violate the helmet's default Content Security Policy (CSP), which does not allow loading of cross-site scripts.
To allow these scripts to be loaded we modify the helmet configuration so that it sets CSP directives to allow script loading from the indicated domains.
For your own server you can add/disable specific headers as needed by following the instructions for using helmet here.
Add rate limiting to the API routes
Express-rate-limit is a middleware package that can be used to limit repeated requests to APIs and endpoints. There are many reasons why excessive requests might be made to your site, such as denial of service attacks, brute force attacks, or even just a client or script that is not behaving as expected. Aside from performance issues that can arise from too many requests causing your server to slow down, you may also be charged for the additional traffic. This package can be used to limit the number of requests that can be made to a particular route or set of routes.
Install this at the root of your project by running the following command:
npm install express-rate-limit
Open ./app.js and require the express-rate-limit library as shown.
Then add the module to the middleware chain with the use() method.
const compression = require("compression");
const helmet = require("helmet");

const app = express();

// Set up rate limiter: maximum of twenty requests per minute
const RateLimit = require("express-rate-limit");
const limiter = RateLimit({
  windowMs: 1 * 60 * 1000, // 1 minute
  max: 20,
});
// Apply rate limiter to all requests
app.use(limiter);

// …
Note:
- The command above limits all requests to 20 per minute. You can change this as needed.
- Third-party services like Cloudflare can also be used if you need more advanced protection against denial of service or other types of attacks.
Example: Installing LocalLibrary on Railway
This section provides a practical demonstration of how to install LocalLibrary on Railway.
Why Railway?
We are choosing to use Railway for several reasons:
- Railway has a starter plan free tier that is really free, albeit with some limitations. The fact that it is affordable for all developers is really important to MDN!
- Railway takes care of most of the infrastructure so you don't have to. Not having to worry about servers, load balancers, reverse proxies, and so on, makes it much easier to get started.
- Railway has a focus on developer experience for development and deployment, which leads to a faster and softer learning curve than many other alternatives.
- The skills and concepts you will learn when using Railway are transferrable. While Railway has some excellent new features, many of the same ideas and approaches are used by other popular hosting services.
-
The service and plan limitations do not really impact us using Railway for the tutorial.
For example:
- The starter plan only offers 500 hours of continuous deployment time each month, and $5 of credit that is consumed based on usage. At the end of each month the hours and credit are reset and any projects must be redeployed. These constraints mean that you could run this tutorial continuously for about 21 days, which is more than enough for development and testing. However you wouldn't be able to use this plan for a "real" production site.
- The starter plan environment has only 512 MB of RAM and 1 GB of storage memory; more than enough for the tutorial.
- At time of writing there is only one supported region, which is in the USA. The service outside this region might be slower, or blocked by local regulations.
- Other limitations can be found in the Railway plan documentation.
- The service appears to be very reliable, and if you end up loving it, the pricing is predictable, and scaling your app is very easy.
While Railway is appropriate for hosting this demonstration, you should take the time to determine if it is suitable for your own website.
How does Railway work?
Web applications are each run in their own isolated and independent virtualized container. In order to execute your application, Railway needs to be able to set up the appropriate environment and dependencies, and also understand how it is launched.
Railway makes this easy, as it is able to automatically recognize and install many different web application frameworks and environments based on their use of "common conventions". For example, Railway recognizes node applications because they have a package.json file, and can determine the package manager used for building from the "lock" file. For example, if the application includes the file package-lock.json Railway knows to use npm to install the packages, whereas if it finds yarn.lock it knows to use yarn. Having installed all the dependencies, Railway will look for scripts named "build" and "start" in the package file, and use these to build and run the code.
Note: Railway uses Nixpacks to recognize various web application frameworks written in different programming languages. You don't need to know anything else for this tutorial, but you can find out more about options for deploying node applications in Nixpacks Node.
Once the application is running it can configure itself using information provided in environment variables. For example, an application that uses a database must get the address using a variable. The database service itself may be hosted by Railway or some other provider.
Developers interact with Railway through the Railway site, and using a special Command Line Interface (CLI) tool. The CLI allows you to associate a local Github repository with a railway project, upload the repository from the local branch to the live site, inspect the logs of the running process, set and get configuration variables and much more. One of the most useful features is that you can use the CLI to run your local project with the same environment variables as the live project.
In order to get our application to work on Railway, we'll need to put our Express web application into a git repository and make a few minor modifications. Once we've done that, we can set up a Railway account, install our website and a database, and also try out the Railway client.
That's all the overview you need in order to get started.
Creating an application repository in GitHub
Railway is closely integrated with Github and the git source code version control system, and you can configure it to automatically deploy updates when changes are made to a particular repository or branch on Github. Alternatively you can push your current local code branch direct to the railway deployment using the CLI.
Note: Using a source code management system like Github is good software development practice. Skip this step if you're already using Github to manage your source.
There are a lot of ways to work with git, but one of the easiest is to first set up an account on GitHub, create the repository there, and then sync to it locally:
- Visit https://github.com/ and create an account.
- Once you are logged in, click the + link in the top toolbar and select New repository.
- Fill in all the fields on this form. While these are not compulsory, they are strongly recommended.
- Enter a new repository name (e.g. express-locallibrary-tutorial), and description (e.g. "Local Library website written in Express (Node)".
- Choose Node in the Add .gitignore selection list.
- Choose your preferred license in the Add license selection list.
- Check Initialize this repository with a README.
Warning: The default "Public" access will make all source code — including your database username and password — visible to anyone on the internet! Make sure the source code reads credentials only from environment variables and does not have any credentials hard-coded.
Otherwise, select the "Private" option to allow only selected people to see the source code.
- Press Create repository.
- Click the green Clone or download button on your new repo page.
-
Copy the URL value from the text field inside the dialog box that appears.
If you used the repository name "express-locallibrary-tutorial", the URL should be something like:
https://github.com/<your_git_user_id>/express-locallibrary-tutorial.git.
Now that the repository ("repo") is created we are going to want to clone it on our local computer:
- Install git for your local computer (you can find versions for different platforms here).
- Open a command prompt/terminal and clone your repo using the URL you copied above:
This will create the repository inside the current directory.
git clone https://github.com/<your_git_user_id>/express-locallibrary-tutorial.git - Navigate into the repo folder.
cd express-locallibrary-tutorial
The final step is to copy your application source files into the repo folder, and then make them part of the repo using git:
- Copy your Express application into this folder (excluding /node_modules, which contains dependency files that you should fetch from npm as needed).
- Open a command prompt/terminal and use the
addcommand to add all files to git.git add -A -
Use the
statuscommand to check that all files you are about tocommitare correct (you want to include source files, not binaries, temporary files etc.). It should look a bit like the listing below.> git status On branch main Your branch is up-to-date with 'origin/main'. Changes to be committed: (use "git reset HEAD <file>..." to unstage) new file: ... -
When you're satisfied,
committhe files to your local repo. This is equivalent to signing off on the changes and making them an official part of the local repo.git commit -m "First version of application moved into GitHub" -
At this point, the remote repo has not been changed.
The last step is to synchronize (
push) your local repo up to the remote GitHub repo using the following command:git push origin main
When this operation completes, you should be able to go back to the page on GitHub where you created your repo, refresh the page, and see that your whole application has now been uploaded. You can continue to update your repo as files change using this add/commit/push cycle.
Note: This is a good point to make a backup of your "vanilla" project — while some of the changes we're going to be making in the following sections might be useful for deployment on any hosting service (or for development) others might not.
The best way to do this is to use git to manage your revisions. With git you can not only go back to a particular past version, but you can maintain this in a separate "branch" from your production changes and cherry-pick any changes to move between production and development branches. Learning Git is well worth the effort, but is beyond the scope of this topic.
The easiest way to do this is to just copy your files into another location. Use whichever approach best matches your knowledge of git!
Update the app for Railway
This section explains the changes you'll need to make to our LocalLibrary application to get it to work on Railway. Note that these changes will not prevent you using the local testing and workflows we've already learned.
Set node version
The package.json contains everything Railway needs to work out your application dependencies and what file should be launched to start your site.
The only important information missing from our current package.json is the version of node. You can find the version of node we're using for development by entering the command:
>node --version
v16.17.1
Open package.json, and add this information as an engines > node section as shown (using the version number for your system).
{
  "name": "express-locallibrary-tutorial",
  "version": "0.0.0",
  "engines": {
    "node": ">=16.17.1"
  },
  "private": true,
  // …
Note that there are other ways to provision the node version on Railway, but we're using package.json because this approach is widely supported by many services. Note also that Railway will not necessarily use the precise version of node that you specify. Where possible it will use a version that has the same major version number.
Database configuration
So far in this tutorial, we've used a single database that is hard-coded into app.js. Normally we'd like to be able to have a different database for production and development, so next we'll modify the LocalLibrary website to get the database URI from the OS environment (if it has been defined), and otherwise use our development database.
Open app.js and find the line that sets the MongoDB connection variable. It will look something like this:
const mongoDB =
  "mongodb+srv://your_user_name:your_password@cluster0.lz91hw2.mongodb.net/local_library?retryWrites=true&w=majority";
Replace the line with the following code that uses process.env.MONGODB_URI to get the connection string from an environment variable named MONGODB_URI if has been set (use your own database URL instead of the placeholder below.)
// Set up mongoose connection
const dev_db_url =
  "mongodb+srv://your_user_name:your_password@cluster0.lz91hw2.mongodb.net/local_library?retryWrites=true&w=majority";
const mongoDB = process.env.MONGODB_URI || dev_db_url;
Get dependencies and re-test
Before we proceed, let's test the site again and make sure it wasn't affected by any of our changes.
First, we will need to fetch our dependencies (you will recall we didn't copy the node_modules folder into our git tree). You can do this by running the following command in your terminal at the root of the project:
npm install
Now run the site (see Testing the routes for the relevant commands) and check that the site still behaves as you expect.
Save changes to GitHub
Next, let's save all our changes to GitHub. In the terminal (whilst inside our repository), enter the following commands:
git add -A
git commit -m "Added files and changes required for deployment"
git push origin main
We should now be ready to start deploying LocalLibrary on Railway.
Get a Railway account
To start using Railway you will first need to create an account:
- Go to railway.app and click the Login link in the top toolbar.
- Select Github in the popup to login using your Github credentials
- You may then need to go to your email and verify your account.
- You'll then be logged in to the Railway.app dashboard: https://railway.app/dashboard.
Deploy on Railway from Github
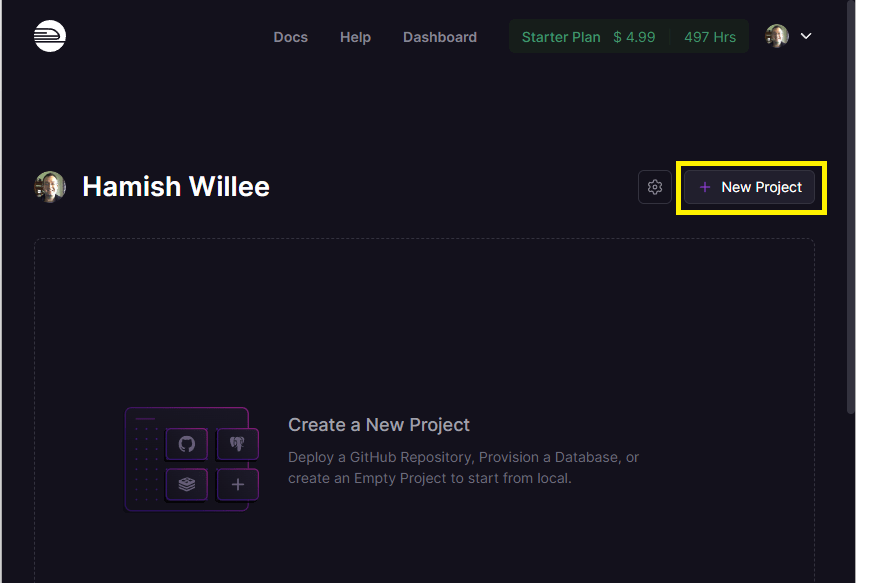
Next we'll setup Railway to deploy our library from Github. First choose the Dashboard option from the site top menu, then select the New Project button:
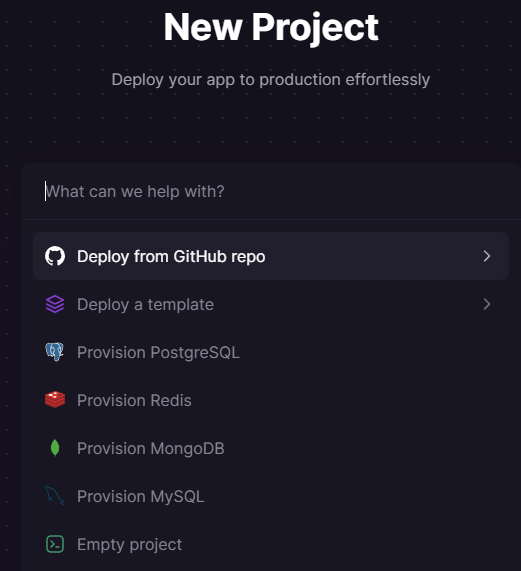
Railway will display a list of options for the new project, including the option to deploy a project from a template that is first created in your Github account, and a number of databases. Select Deploy from GitHub repo.
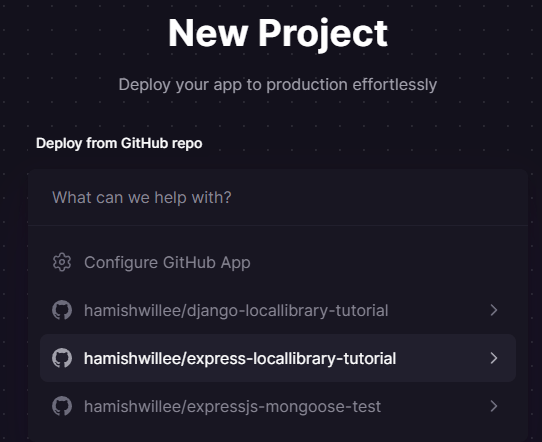
All projects in the Github repos you shared with Railway during setup are displayed.
Select your Github repository for the local library: <user-name>/django-locallibrary-tutorial.
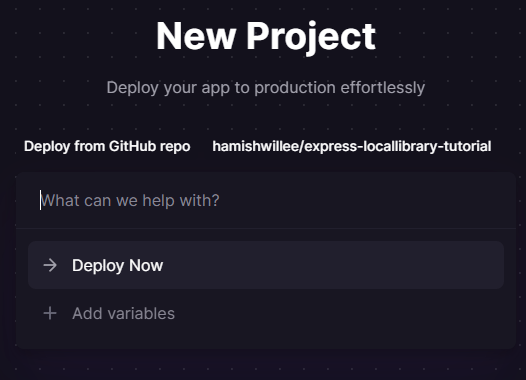
Confirm your deployment by selecting Deploy Now.
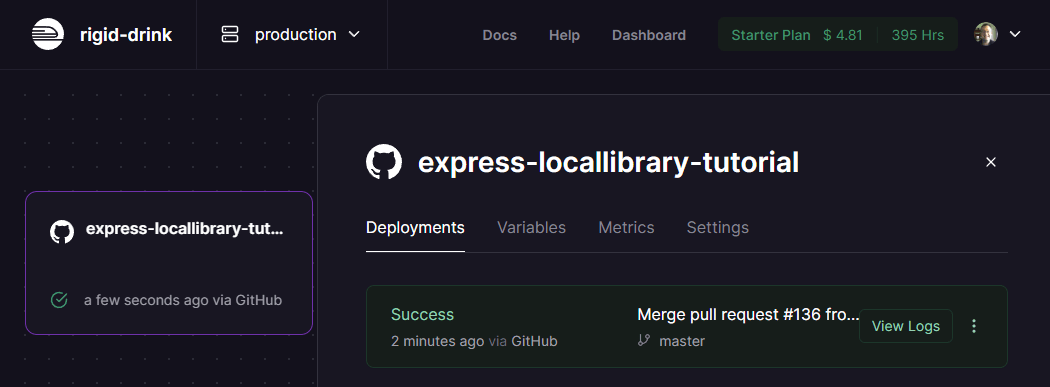
Railway will then load and deploy your project, displaying progress on the deployments tab. When deployment successfully completes, you'll see a screen like the one below.
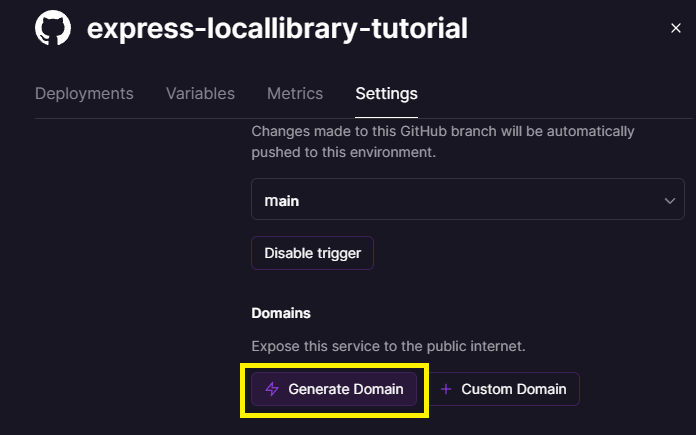
Now select the Settings tab, then scroll down to the Domains section, and press the Generate Domain button.
This will publish the site and put the domain in place of the button, as shown below.
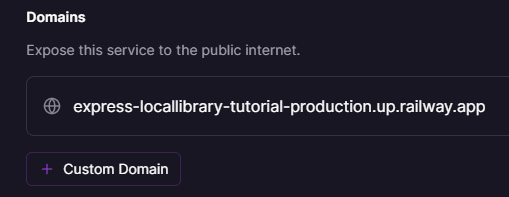
Select the domain URL to open your library application. Note that because we haven't specified a production database, the local library will open using your development data.
Provision and connect a MongoDb database
Instead of using our development data, next let's create a production MongoDB database to use instead. We will create the database as part of the Railway application project, although there is nothing to stop you creating in its own separate project, or indeed to use a MongoDB Atlas database for production data, just as you have for the development database.
On Railway, choose the Dashboard option from the site top menu and then select your application project. At this stage it just contains a single service for your application (this can be selected to set variables and other details of the service). Select the New button, which is used to add services to the current project.

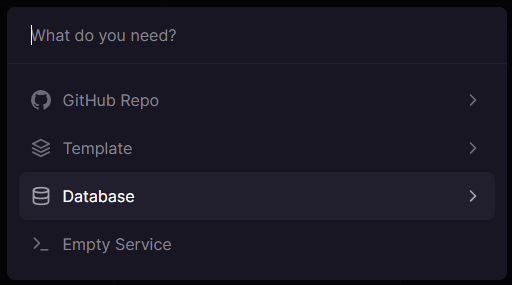
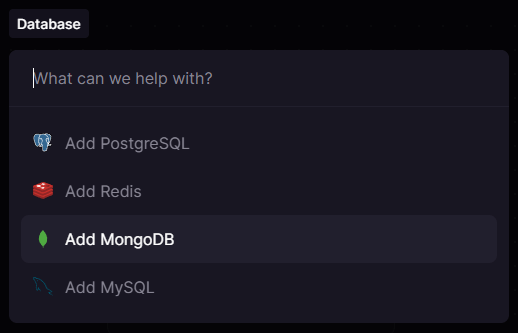
Select Database when prompted about the type of service to add:
Then select Add MongoDB to start adding the database
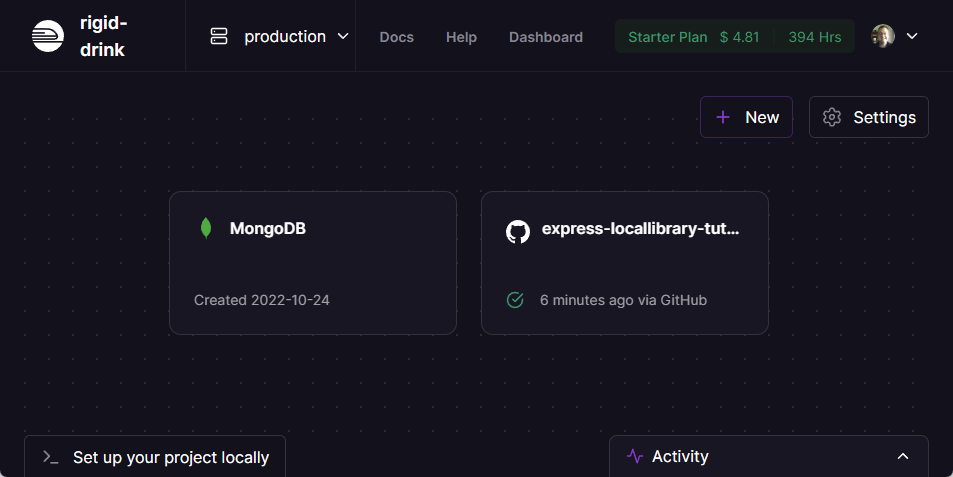
Railway will then provision a service containing an empty database in the same project. On completion you will now see both the application and database services in the project view.
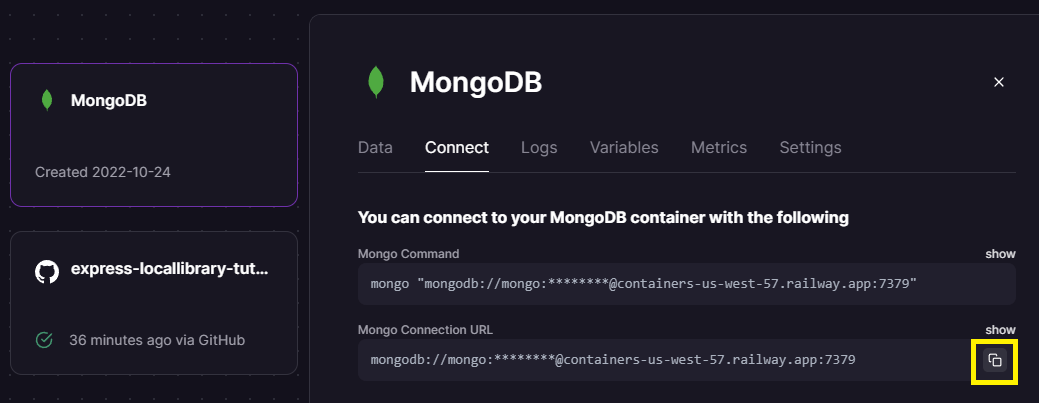
Select the MongoDB service to display information about the database. Open the Connect tab and copy the "Mongo Connection URL" (this is the address of the database).
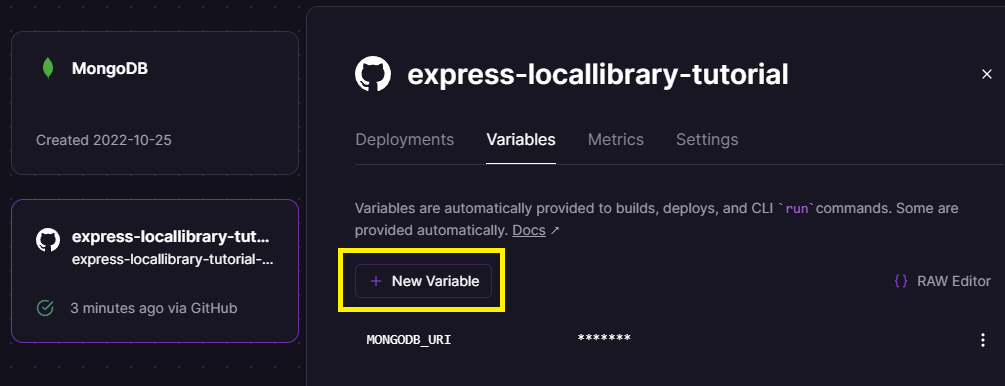
To make this accessible to the library application we need to add it to the application process using an environment variable. First open the application service. Then select the Variables tab and press the New Variable button.
Enter the variable name MONGODB_URI and the connection URL you copied for the database (MONGODB_URI is the name of the environment variable from which we configured the application to read the database address).
This will look something like the screen shown below.
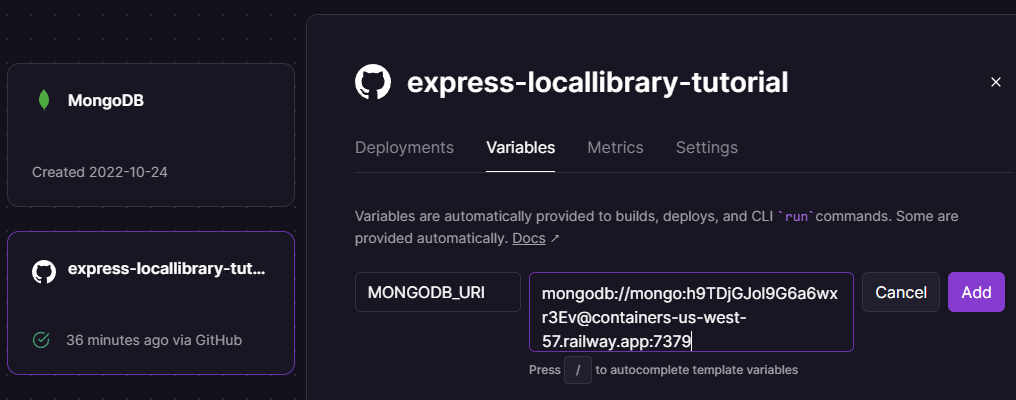
Select Add to add the variable.
Railway restarts your app when it updates variables. If you check the home page now it should show zero values for your object counts, as the changes above mean that we're now using a new (empty) database.
Other configuration variables
You will recall from a preceding section that we need to set NODE_ENV to 'production' in order to improve our performance and generate less-verbose error messages. We can do this in the same screen as we set the MONGODB_URI variable.
Open the application service.
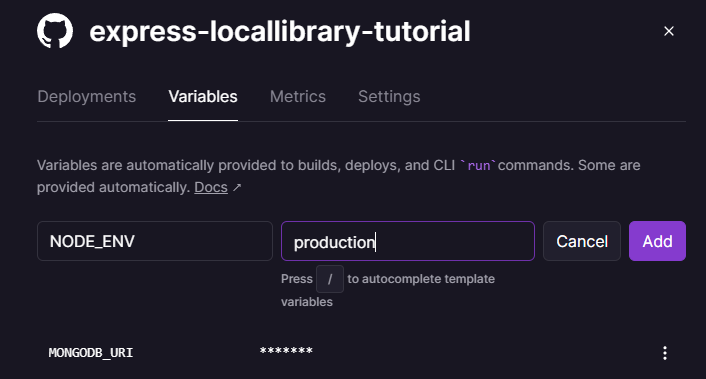
Then select the Variables tab, where you will see that MONGODB_URI is already defined, and press the New Variable button.
Enter NODE_ENV as the name of the new variable and production as the name of the environment.
Then press the Add button.
The local library application is now setup and configured for production use. You can add data through the website interface and it should work in the same way that it did during development (though with less debug information exposed for invalid pages).
Note: If you just want to add some data for testing you might use the populatedb script (with your MongoDB production database URL) as discussed in the section Express Tutorial Part 3: Using a Database (with Mongoose) Testing — create some items.
Install the client
Download and install the Railway client for your local operating system by following the instructions here.
After the client is installed you will be able run commands. Some of the more important operations include deploying the current directory of your computer to an associated Railway project (without having to upload to github), and running your project locally using the same settings as you have on the production server.
You can get a list of all the possible commands by entering the following in a terminal.
railway help
Debugging
The Railway client provides the logs command to show the tail of logs (a more full log is available on the site for each project):
railway logs
Summary
That's the end of this tutorial on setting up Express apps in production, and also the series of tutorials on working with Express. We hope you've found them useful. You can check out a fully worked-through version of the source code on GitHub here.
See also
- Production best practices: performance and reliability (Express docs)
- Production Best Practices: Security (Express docs)
- Railway Docs
- Digital Ocean
- Heroku
- Getting Started on Heroku with Node.js (Heroku docs)
- Deploying Node.js Applications on Heroku (Heroku docs)
- Heroku Node.js Support (Heroku docs)
- Optimizing Node.js Application Concurrency (Heroku docs)
- How Heroku works (Heroku docs)
- Dynos and the Dyno Manager (Heroku docs)
- Configuration and Config Vars (Heroku docs)
- Limits (Heroku docs)